Running Android UI Tests - Part 1
In Medisafe 💊, we know how much our users depend and rely on our product. That is why we go the extra mile to make sure we bring them a complete, reliable solution that really works. Besides our Product and Dev teams, we do a lot of manual QA and put a lot of effort into answering our users daily through our support. Just as an example to just how much coding and a quality app saves lives - read this amazing story. To top it all, we were featured both on Android and iOS apps and were recently chosen for Editor’s Choice 🎉 on Google Play.
While we improve and extend our capabilities and partnerships, we had to start writing and running automation tests. We started by covering all manual sanity scenarios. We have many. The idea (at least for now) is to run automation tests on every build and on every branch. There are some basic things we wanted to achieve when running automated tests. We wanted no additional headaches other than working with Espresso and UIAutomator on Android side. Therefore any additional features should be simple and straightforward to apply. We wanted to be able to quickly investigate failed tests, we wanted to use only unrooted, vanilla devices.
We came up with a working flow that works perfectly for us at Medisafe and we wanted to share it with you.
Running tests
Test Options
We write UI tests same as before, when we did it manually. Only now, we can add more annotations that will give us more options:
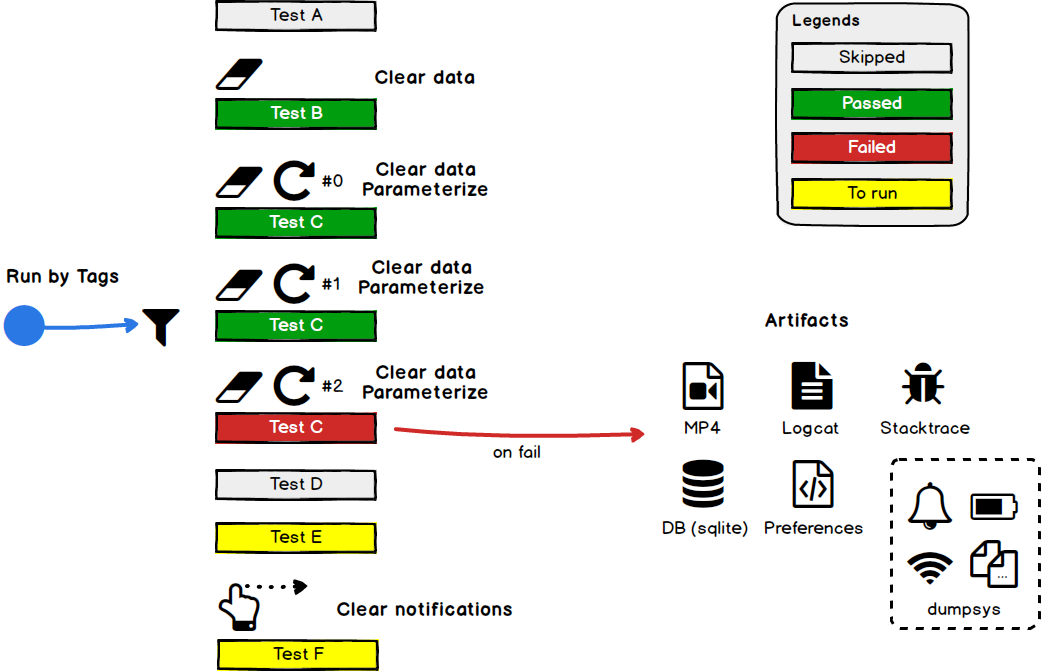
- ClearData - Clear data via ADB before test execution.
- Repeat - Repeat the same test X number of times, when current iteration is passed to the test.
- Tags - You can tag your tests. Later, you can run tests by selected tags only.
- ClearNotifications - Clear notification bar via ADB before running the test.
Test example
@RunWith(AndroidJUnit4.class)
public class ExampleInstrumentedTest {

    @Rule
    public IntentsTestRule<MainActivity> mActivity = new IntentsTestRule<>(MainActivity.class);

    private final String[] params = new String[]{
            "a", "A", "Aa"
    };

    @Test
    @ClearData
    @Parameterized.Repeat(count = 3)
    @Tags(tags = {"sanity", "small", "sample"})
    public void someTest() throws Exception {
        String param = params[Parameterized.getIndex()];
        assertEquals("a", param.toLowerCase());
    }
}
“someTest” will fail on 3rd iteration, because a != aa
Artifacts
In addition to new added options, after each failed test, we fetch and build useful files that will help us investigate the failed issues better:
- Recording (mp4)
- Logs
- DB (sqlite)
- Shared preferences
- Dumpsys - Netstats, battery, other.
📘 For this blog post
- Source code: https://github.com/medisafe/run-android-tests
- Device: Vanilla device. We are using regular Nexus 5X with Nougat.
- Android frameworks: Espresso, UIAutomator
- Script: Used for building and running execution plan. Written in bash.
📖 Table of Content
The Idea
Instead of running all tests at once, we run them one at a time, test by test. For each test we collect logs, record a video, dump db and preferences. The main trick is to control additional tasks for every test such as clearing data by using custom annotations, InstrumentationRunListener, ADB and simple bash touch.
Note:
connectAndroidTest- One might ask, why aren’t we using the connectedAndroidTest gradle task and combining it with customRules. The issue is that we can’t run shell commands within a running process and user on an unrooted device. For example - “Clear data” can’t be done this way.
The flow - prepare & run

Prepare
- Assemble app and test APKs and install them on device.
- Use
-e log trueto retrieve all tests with their meta data. - Parse the tests raw file and create ‘execution plan’ for running the tests.
Run
- Run the executable plan line by line.
- For each non test, run appropriate ADB command.
- For each UI test start video recording, logcat.
- Execute the test.
- If test failed stop everything.
- Pull the video from device.
- Dump DB, preferences, dumpsys files.
Results
I am not going to describe these steps, but this is what we do in general:
- Deploy artifacts to cloud storage (S3/Drive/etc.).
- Notify on company channels (Slack/Hipchat/Trello/Jira/etc.).
- Send some CURLs to my internal webhooks to audit the results.

Building Execution Plan
In this chapter we will:
- Assemble and install app and test APKs.
- Fetch and print raw tests to by using
-e log trueflag. - Extract the tests from raw file and build execution plan - execution-plan.txt.
- Run the tests.
Go to run-android-tests folder and from terminal, build app and test APKs:
# build app APK
./gradlew assembleDebug --stacktrace
# build test APK
./gradlew assembleAndroidTest --stacktrace
Install both app APK and test APK on real device.
# install app APK
adb install -r app/build/outputs/apk/app-debug.apk
# install test APK
adb install -r app/build/outputs/apk/app-debug-androidTest.apk
Print all available tests to the file: raw-tests.txt.
./scripts/1/raw.sh artifacts/raw-tests.txt
The raw.sh script doesn’t run the tests. By using -e log true flag, we
print the tests only without real execution.
adb shell am instrument -w -r -e log true -e package com.sromku.sample.runtests.basic com.sromku.sample.runtests.test/android.support.test.runner.AndroidJUnitRunner > artifacts/raw-tests.txt
raw-tests.txt:
INSTRUMENTATION_STATUS: numtests=2
INSTRUMENTATION_STATUS: stream= com.sromku.sample.runtests.basic.BasicOne:
INSTRUMENTATION_STATUS: id=AndroidJUnitRunner
INSTRUMENTATION_STATUS: test=useAppContext
...
Build execution plan
Let’s parse this file and extract all available tests and create execution plan to execution-plan.txt
./scripts/1/plan.sh artifacts/raw-tests.txt artifacts/execution-plan.txt
The script iterates over all lines of raw file and extracts the full name of the tests of format Class#method. Later it will also do more extractions from annotations (I will explain later).
execution-plan.txt
com.sromku.sample.runtests.basic.BasicOne#testA
com.sromku.sample.runtests.basic.BasicOne#testB
Run the tests
./scripts/1/run.sh artifacts/execution-plan.txt artifacts
Explanation - scripts/1/run.sh
Very simple, we run line by line in execution-plan.txt and execute the test. If we fail, we
stop.
# iterate over all plan line by line
for line in `cat artifacts/execution-plan.txt`
do

	# on each iteration, run one test
	adb shell am instrument -w -e class $line
    com.sromku.sample.runtests.test/android.support.test.runner.AndroidJUnitRunner >
    artifacts/running-test.txt

    # if we fail, we exit
    if grep -q "FAILURES!!!" "artifacts/running-test.txt"; then
    	echo "[x] FAIL"
        exit 1
    fi

    # we're here because test was passed
    echo "[v] OK"

done
FAILURES!!! - is something that is hard coded in JUnit4 - As seen on their branch. Thus we can rely on this.
Collect Logs, Record Video, Dump DB, Shared Preferences
Once we can run the tests from script, we have the advantage of running shell commands between the tests. This means that, before starting each test we can start Logcat and video recording processes and stop once the test is completed.
Do the same steps as before:
- Assemble and install app and test APKs
- Fetch and print raw tests to by using flag
-e log true - Extract the tests from raw file and make execution plan - execution-plan.txt
- Run the test and plan.
Prepare
Same as before. Assemble and install test APK. Create raw test file raw-tests.txt.
./gradlew assembleAndroidTest --stacktrace
adb install -r app/build/outputs/apk/app-debug-androidTest.apk
./scripts/2/raw.sh artifacts/raw-tests.txt
Build execution plan
./scripts/2/plan.sh artifacts/raw-tests.txt artifacts/execution-plan.txt
Run the tests
./scripts/2/run.sh artifacts/execution-plan.txt artifacts
The same script as in scripts/1/run.sh besides the addition before and after test execution. We start logcat process and start video recording. At the end of the test we kill both processes. Then we dump db and fetch shared preferences.
scripts/2/run.sh
# iterate over all plan line by line
for line in `cat artifacts/execution-plan.txt`
do

	# start collecting logs
    adb logcat > "artifacts/logcat.txt" &
    PID_LOGCAT=$!

    # start recording video
    adb shell screenrecord --bit-rate 6000000 "/sdcard/recording.mp4" &
    PID_RECORDING=$!

	# on each iteration, run one test
	adb shell am instrument -w -e class $line
    com.sromku.sample.runtests.test/android.support.test.runner.AndroidJUnitRunner >
    artifacts/running-test.txt

    # kill logcat process
    kill $PID_LOGCAT
    sleep 1

    # kill recording process
    kill $PID_RECORDING
    sleep 3

     # pull and remove recording from device
    adb pull "/sdcard/recording.mp4" artifacts/recording.mp4
    adb shell rm "/sdcard/recording.mp4"

    # dump db
    adb shell "run-as com.sromku.sample.runtests cat /data/data/com.sromku.sample.runtests/databases/app.db" > artifacts/app.db

    # extract preferences
    adb shell "run-as com.sromku.sample.runtests cat /data/data/com.sromku.sample.runtests/shared_prefs/com.sromku.sample.runtests_preferences.xml" > artifacts/shared_preferences.xml

    # if we fail, we exit
    if grep -q "FAILURES!!!" "artifacts/running-test.txt"; then
    	echo "[x] FAIL"
        exit 1
    fi

    # we're here because test was passed
    echo "[v] OK"

done
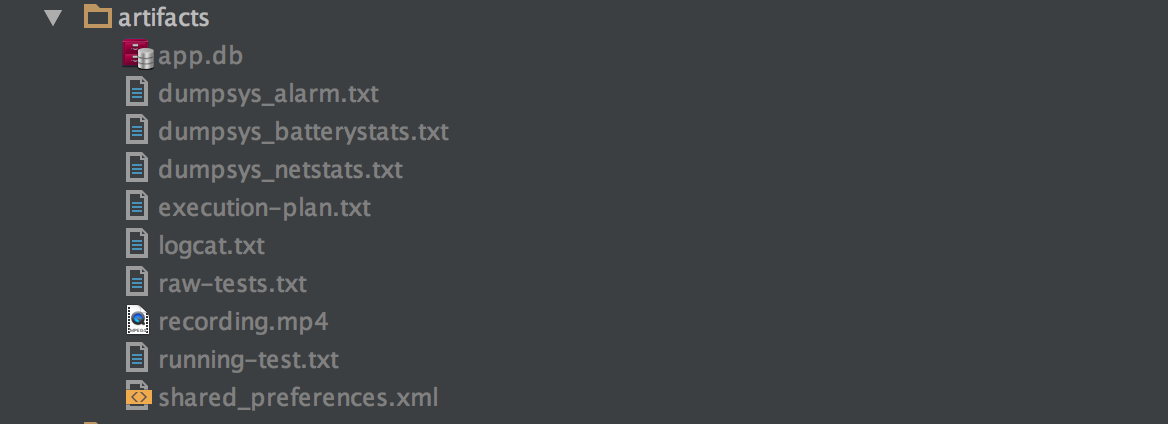
📦 The artifacts folder will contain:
- recording.mp4
- logcat
- running-test.txt <- with full stacktrace inside
- app.db - dumped sqlite db
- shared_preferences.xml - default shared preferences file
Add Clear data support
Originally I wanted to clear data before selected tests. Unfortunately it’s impossible from already
running process on device. I had to find a working solution. This is how to clear data. We just put
@ClearData annotation above the test ;)
@Test
@ClearData
public void testB() throws Exception {
	Context appContext = InstrumentationRegistry.getTargetContext();
	assertEquals("com.sromku.sample.runtests", appContext.getPackageName());
}
The idea is as follow:
- We create a new annotation and call it
ClearData. - Add new
AnnotationsTestPrinterthat prints all annotations to the raw-tests.txt file. - Build an execution plan and add clearData command.
- Execute the plan and run
adb shell pm clear packagewhere said.
Adding ClearData annotation
We add new annotation under androidTest called ClearData.
@Retention(RetentionPolicy.RUNTIME)
@Target({ElementType.METHOD})
public @interface ClearData {
}
Extending and printing raw file with new AnnotationsTestPrinter
When we print all available tests by using -e log true, we trigger built-in
InstrumentationRunListeners and each of them print some metadata about the test. So, we
can ride on the same logic and add our own class that will print test’s annotations as well.
public class AnnotationsTestPrinter extends InstrumentationRunListener {

    @Override
    public void testStarted(Description description) throws Exception {
        super.testStarted(description);

        Collection<Annotation> annotations = description.getAnnotations();
        if (annotations == null) {
            return;
        }

        Bundle bundle = new Bundle();
        StringBuilder stringBuilder = new StringBuilder();
        boolean comm = false;
        for (Annotation annotation : annotations) {
            if (comm) stringBuilder.append(",");
            stringBuilder.append(annotation.annotationType().getSimpleName());
            comm = true;
        }

        bundle.putString("annotations", stringBuilder.toString());
        getInstrumentation().sendStatus(
          InstrumentationResultPrinter.REPORT_VALUE_RESULT_START, bundle);
    }
}
Now, we need to run:
./scripts/3/raw.sh artifacts/raw-tests.txt
Added: -e listener com.sromku.sample.runtests.AnnotationsTestPrinter. Android JUnit
Runner will run this listener per test.
The raw-tests.txt will look like this:
...
INSTRUMENTATION_STATUS: current=2
INSTRUMENTATION_STATUS_CODE: 1
INSTRUMENTATION_STATUS: annotations=ClearData,Test
INSTRUMENTATION_STATUS_CODE: 1
INSTRUMENTATION_STATUS: numtests=2
...
🔥 You can see a new line there: INSTRUMENTATION_STATUS: annotations=ClearData,Test
Build execution plan
./scripts/3/plan.sh artifacts/raw-tests.txt artifacts/execution-plan.txt
The updated script extracts the annotations and takes ClearData into account.
The printed execution-plan.txt will look something like this:
com.sromku.sample.runtests.clear.ClearOne#testA
clearData
com.sromku.sample.runtests.clear.ClearOne#testB
You can see the added line clearData which means that we need to clear data at this point of time.
Run the tests
Run scripts/3/run.sh
./scripts/3/run.sh artifacts/execution-plan.txt artifacts
This is exactly the same script as scripts/2/run.sh other than a small additions of checking
if line==clearData. If yes, clear data by using ADB command and continue to the next
line in the execution plan.
# iterate over all plan line by line
for line in `cat artifacts/execution-plan.txt`
do

	# in case of clear data we execute and move to next line
    if [ $line == "clearData" ]; then
        adb shell pm clear com.sromku.sample.runtests
        sleep 3
        continue
    fi

	# SAME as before - in scripts/2/run.sh
	# ...
    # ...

done
Add Clear notificationsadd_clear_notifications_support support
Sometimes we just want to clean the notifications bar. It can happen if I need to test that I received a new notification. But before I get one, I must be sure that the notification bar is clean of previous alerts.
All we need to do is to add ClearNotifications annotation.
@Test
@ClearNotifications
public void testB() throws Exception {
	Context appContext = InstrumentationRegistry.getTargetContext();
	assertEquals("com.sromku.sample.runtests", appContext.getPackageName());
}
The idea is exactly the same as ClearData:
- We create a new annotation and call it
ClearNotifications. - We use
AnnotationsTestPrinterthat we already created. - Build an execution plan and add clearNotifications command.
- Execute the plan and clear notifications from ADB. I already wrote about the way of cleaning notifications from ADB in my previous blog post.
Adding ClearNotifications annotation
We add new annotation under androidTest called ClearNotifications.
@Retention(RetentionPolicy.RUNTIME)
@Target({ElementType.METHOD})
public @interface ClearNotifications {
}
Run and create raw_tests.txt:
./scripts/4/raw.sh artifacts/raw-tests.txt
The raw-tests.txt will look like this:
...
INSTRUMENTATION_STATUS: current=2
INSTRUMENTATION_STATUS_CODE: 1
INSTRUMENTATION_STATUS: annotations=ClearNotifications,Test
INSTRUMENTATION_STATUS_CODE: 1
INSTRUMENTATION_STATUS: numtests=2
INSTRUMENTATION_STATUS: stream=.
INSTRUMENTATION_STATUS: id=AndroidJUnitRunner
...
:fire: You can see a new line there: INSTRUMENTATION_STATUS: annotations=ClearNotifications,Test
Build execution plan
./scripts/4/plan.sh artifacts/raw-tests.txt artifacts/execution-plan.txt
The updated script extracts the annotations and takes ClearNotifications into account.
The printed execution-plan.txt will look something like this:
com.sromku.sample.runtests.notif.NotifOne#testA
clearNotifications
com.sromku.sample.runtests.notif.NotifOne#testB
You can see the added line clearNotifications which says that we need to clear notifications at this point of time.
Run the tests
./scripts/4/run.sh artifacts/execution-plan.txt artifacts
This is exactly the same script as scripts/3/run.sh except addition checking if
line==clearNotifications. If yes, clear notifications by using ADB command and continue
to the next line in the execution plan.
# iterate over all plan line by line
for line in `cat artifacts/execution-plan.txt`
do

	# in case of clear data we execute and move to next line
    if [ $line == "clearData" ]; then
        adb shell pm clear com.sromku.sample.runtests
        sleep 3
        continue
    fi

    # in case of clear notifications we execute and move to next line
    if [ $line == "clearNotifications" ]; then
        cleanNotifications
        sleep 3
        continue
    fi

	# SAME as before - in scripts/2/run.sh
	# ...
    # ...

done
The cleanNotifications bash command is explained here.
Add parameterized support
Just add @Parameterized.Repeat(count = 3) and this test will be executed 3 times with
index param: 0,1,2. Get the current running index from the test through:
Parameterized.getIndex().
private final String[] params = new String[]{
        "a", "A", "Aa"
};

@Test
@Parameterized.Repeat(count = 3)
@ClearData
public void testC() throws Exception {
    String param = params[Parameterized.getIndex()];
    assertEquals("a", param.toLowerCase());
}
In this case, you can even see that I combined it with
@ClearDatawhich means that before each test iteration, we will clear app data. Cool! 😀
Create raw_tests.txt
./scripts/5/raw.sh artifacts/raw-tests.txt
The raw-tests.txt will look like this:
...
INSTRUMENTATION_STATUS: current=2
INSTRUMENTATION_STATUS_CODE: 1
INSTRUMENTATION_STATUS: annotations=Repeat:3,Test
INSTRUMENTATION_STATUS_CODE: 1
INSTRUMENTATION_STATUS: numtests=3
INSTRUMENTATION_STATUS: stream=.
INSTRUMENTATION_STATUS: id=AndroidJUnitRunner
INSTRUMENTATION_STATUS: test=testB
...
You can see a new annotation called Repeat and number of iterations, 3, in this case.
To make this happen, we need to update AnnotationsTestPrinter . Check in the source code
for full
class implementation. The difference:
if (annotation instanceof Parameterized.Repeat) {
    Parameterized.Repeat repeat = (Parameterized.Repeat) annotation;
    stringBuilder.append(":" + repeat.count());
}
Build execution plan
./scripts/5/plan.sh artifacts/raw-tests.txt artifacts/execution-plan.txt
The plan will look like this:
clearData
com.sromku.sample.runtests.param.ParamOne#testA:0
clearData
com.sromku.sample.runtests.param.ParamOne#testA:1
com.sromku.sample.runtests.param.ParamOne#testB:0
com.sromku.sample.runtests.param.ParamOne#testB:1
com.sromku.sample.runtests.param.ParamOne#testB:2
Now, each executable test, that should be run with param, will have an iteration number at the end of it. This number will be passed as param to the test when running.
Run the tests
./scripts/5/run.sh artifacts/execution-plan.txt artifacts
This is how we pass param to the test. Taken from ./scripts/5/run.sh
adb shell am instrument -w -e class $test -e paramIndex $index $package.test/android.support.test.runner.AndroidJUnitRunner > $runningTest
And on Java side we call: Parameterized.getIndex(); The implementation of this method just takes our param from InstrumentationRegistry.
InstrumentationRegistry.getArguments().getString("paramIndex");
Run tests by tags
Android already has an option to filter tests by:
- Package name
- Custom Annotation
- Or by test size
SmallTestorMediumTestorLargeTest
In our case, we want filter and run tests by multiple features / tags. For example,
we want choose tests that relate to “registration”, “settings”. Why? because this is the only part
we have changed in our code. Or, because we had server issues in the middle of tests and we want to
re-run only these sections.
In addition, we run sanity tests on every push to master. In this case, I don’t
really care for the tests size and features, but run ALL tests tagged as “sanity”.
Honestly, I tried to split tests by packages, but eventually I found myself refactoring and
repackaging multiple times.
And for test size, really what is ‘Small’ and what is ‘Large’? Why would I
think about such splitting in a real world. If I change some area in my app, then I would run ALL
tests related to this area. Just couldn’t find the use case for this.
Tags
So, eventually we wanted something more flexible. And this is how it looks: We simply add annotation: Tags(tag = {“sanity”, “small”})
@Test
@Tags(tags = {"sanity", "small"})
public void useAppContext() throws Exception {
    Context appContext = InstrumentationRegistry.getTargetContext();
    assertEquals("com.sromku.sample.runtests", appContext.getPackageName());
}
Create raw_tests.txt
./scripts/6/raw.sh artifacts/raw-tests.txt
The raw-tests.txt will look like this:
...
INSTRUMENTATION_STATUS: current=1
INSTRUMENTATION_STATUS_CODE: 1
INSTRUMENTATION_STATUS: tags=sanity,small
INSTRUMENTATION_STATUS_CODE: 1
INSTRUMENTATION_STATUS: annotations=Tags,Test
...
New line: INSTRUMENTATION_STATUS: tags=sanity,small :fire:
To make this happen, we need to update AnnotationsTestPrinter one more time. Check in
the source code for full
class implementation. The difference:
if (annotation instanceof Tags) {
    Tags tags = (Tags) annotation;
    tagsStr = buildTags(tags.tags());
}
buildTags - method that builds tags array as comma separated string.
A) Build execution plan : tags “sanity,extreme”
./scripts/6/plan.sh artifacts/raw-tests.txt artifacts/execution-plan.txt -t "sanity,extreme"
The plan will contain tests that have at least one of the filtered tags. In our case we say - Select all tests that have “sanity” or “extreme” tag.
The plan will be:
com.sromku.sample.runtests.tags.TagsOne#testA
com.sromku.sample.runtests.tags.TagsOne#testB
com.sromku.sample.runtests.tags.TagsOne#testD
com.sromku.sample.runtests.tags.TagsOne#testE
B) Build execution plan : tags “small”
./scripts/6/plan.sh artifacts/raw-tests.txt artifacts/execution-plan.txt -t "small"
The plan will be:
com.sromku.sample.runtests.tags.TagsOne#testA
com.sromku.sample.runtests.tags.TagsOne#testE
You can see that plans are different for different tags 🗄️.
Run the tests
./scripts/6/run.sh artifacts/execution-plan.txt artifacts
Dump network stats, battery, alarms and more
Once we can run any script before the test execution and after, we can add more ADB commands in a very simple way.
I added these next dumps:
- netstats
- batterystats
- alarm
Of course, you can add much more. Check for more options here. Or run:
adb shell dumpsys -l for a complete list of system services.
Create raw-tests.txt
./scripts/7/raw.sh artifacts/raw-tests.txt
Build execution plan
./scripts/7/plan.sh artifacts/raw-tests.txt artifacts/execution-plan.txt
Run the tests
./scripts/7/run.sh artifacts/execution-plan.txt artifacts
New artifacts added:
- dumpsys_netstats.txt
- dumpsys_batterystats.txt
- dumpsys_alarm.txt
Added lines in scripts/7/run.sh on failed test after we dumb the database.
...
# dump whatever you need
adb shell dumpsys netstats > artifacts/dumpsys_netstats.txt
adb shell dumpsys batterystats > artifacts/dumpsys_batterystats.txt
adb shell dumpsys alarm > artifacts/dumpsys_alarm.txt
...
All together
Let’s say you have test with multiple params you want to check - like Login and validation. Say you want it after cleared data, and you run this test by tag called “sanity”. In that case, this is all we need to do:
@Test
@ClearData
@Parameterized.Repeat(count = 3)
@Tags(tags = {"sanity", "small"})
public void userValidLoginTest() throws Exception {
    String param = params[Parameterized.getIndex()];
    // my rest of the test ...
}
Prepare & Run
# ---- assemble and install the app + test apks ----
# build app APK
./gradlew assembleDebug --stacktrace
# build test APK
./gradlew assembleAndroidTest --stacktrace
# install app APK
adb install -r app/build/outputs/apk/app-debug.apk
# install test APK
adb install -r app/build/outputs/apk/app-debug-androidTest.apk

# ---- prepare and run the tests ----
# create tests raw file
./scripts/raw.sh artifacts/raw-tests.txt
# build execution plan and filter by tags
./scripts/plan.sh artifacts/raw-tests.txt artifacts/execution-plan.txt -t "sanity,extreme"
# run the tests
./scripts/run.sh artifacts/execution-plan.txt artifacts
Example of artifacts folder
That’s it for now. Your feedback is important ;)
This post was also posted on Medium