
In this step by step guide I will explain how to setup very basic end to end flow of building Android debug builds.
Steps
Setup VM
Create new Ubuntu 16.04 VM instance from dev
console : n1-standard-1 (1 vCPU, 3.75 GB memory)
Do it once, create SSH key
-
Download
gcloudto your local machine install link. -
Go to VM instance in dev console and in SSH options choose: View gcloud command.
-
Copy the command and run it. For example:
gcloud compute --project "my-secret-project-name" ssh --zone "us-central1-a" "jenkins"The SSH private & public keys will be created -
~/.ssh/google_compute_engine. -
Copy the public key and add to your console
# -- show the content of the key --
$ cat ~/.ssh/google_compute_engine.pub
Copy the public key value to your console. Under Metadata section -> SSH Keys. Ref: this link.
Connect (everytime)
ssh -i [PATH_TO_PRIVATE_KEY] [USERNAME]@[EXTERNAL_IP_ADDRESS]
PATH_TO_PRIVATE_KEY = is the path to your private SSH key file. In this case it is:
~/.ssh/google_compute_engineUSERNAME = is the name of the user connecting to the instance. The username for your SSH key pair was specified when the SSH key pair was created. You can connect to the instance as that user if the instance has a valid public SSH key for that user and if you have the matching private SSH key.
EXTERNAL_IP_ADDRESS is the external IP address for your instance.is the path to your privaate SSH key file.
Open port 8080
-
Select VM, scroll to Network interfaces -> Network column -> Select
default -
Scroll down and click Add firewall rule
name value Name allow-8080 Targets All instances in the network Source filter 0.0.0.0/0 Allowed protocols and ports tcp:8080
Congrats, you can connect to VM from your machine.
Setup Jenkins
-
Install JDK 8:
sudo apt-get install openjdk-8-jdk -
Install Jenkins server:
wget -q -O - https://jenkins-ci.org/debian/jenkins-ci.org.key | sudo apt-key add - sudo sh -c 'echo deb http://pkg.jenkins-ci.org/debian binary/ > /etc/apt/sources.list.d/jenkins.list' sudo apt-get update sudo apt-get install jenkins -
Set some password from newly created user jenkins:
sudo passwd jenkins -
Start jenkins server:
sudo service jenkins start -
Open firewall on
tcp:8080(check VM setup in Ubuntu section) -
Open
http://<your-vm-domain-or-ip>:8080 -
Copy the generated password:
sudo cat /var/lib/jenkins/secrets/initialAdminPassword -
Install suggested plugins. We will anyway come back to plugins we need later. But for now, you can install what is suggested.
-
Complete: Create First Admin User ->
Save and Finish
Congrats, you have Jenkins working and running.
Setup Android SDK
-
Go to https://developer.android.com/studio/index.html#command-tools and copy link address of Linux binary. In my case: https://dl.google.com/android/repository/sdk-tools-linux-3859397.zip
-
Create directory:
/var/lib/jenkins/android-sdk/ -
Download the zip file and unzip
# download android sdk sudo curl https://dl.google.com/android/repository/sdk-tools-linux-3859397.zip -o android-sdk.zip # install unzip command sudo apt-get install unzip # unzip into this folder sudo unzip android-sdk.zip -d . # remove the zip file sudo rm android-sdk.zip -
Update tools
sudo ./bin/sdkmanager "tools" -
Install latest Android SDK Build-Tools, Android SDK Platform, Android Support Repository, Google Repository
sudo ./bin/sdkmanager "build-tools;26.0.2" "platforms;android-26" "extras;android;m2repository" "extras;google;m2repository" -
Install additional mostly used libs: Solver for ConstraintLayout, ConstraintLayout for Android
sudo ./bin/sdkmanager "extras;m2repository;com;android;support;constraint;constraint-layout-solver;1.0.2" "extras;m2repository;com;android;support;constraint;constraint-layout;1.0.2" -
Check list of all available packages and installed
sudo ./bin/sdkmanager --list
Configure Jenkins
Global Properties
Open Jenkins: Manage Jenkins -> Configure System -> Global properties. Mark “Environment variables” and add:
ANDROID_HOME: /var/lib/jenkins/android-sdkJAVA_HOME: /usr/lib/jvm/java-8-openjdk-amd64
Press Save
Add SSH Credentials to Github / Bitbucket repository
-
Switch to
jenkinsuser:su - jenkins -
Create new SSH key and use defaulf name:
id_rsa(see SSH section)Generate new SSH key:
ssh-keygen -t rsa -b 4096 -C "your_email@example.com"the default name will be
id_rsa, but you can set another name if you needAdd key to the ssh-agent:
eval "$(ssh-agent -s)"
ssh-add ~/.ssh/id_rsa
Give more permissions:
chmod 700 ~/.ssh/id_rsaShow public key content:
cat ~/.ssh/id_rsa.pub -
Copy the
id_rsa.pubcontent and paste.- For
Github: -> Go to Your Github repository -> Settings -> Deploy keys. - For
Bitbucket: -> Go to Yout Bitbucket repository -> Settings -> Access keys.
- For
-
Open
Jenkinsand go to Credentials-> System -> Global credentials -> Add CredentialsField Value Kind SSH Username with private key Scope Global Username jenkins Private Key From the Jenkins master ~/.ssh Passphrase ‘the one you used in key creation’
Note: Private Key - if you use custom name and not default one, then be sure setting the full path to private key. Like:
/var/lib/jenkins/.ssh/my_rsa_key
Create Android build job
-
Open
Jenkins-> New Item. Enter any job name. Choose Freestyle projet. Press OK. -
This build is parameterized -> add String Parameter. Give a name:
branch -
Source Code Management -> Check
Gitand give:- Repository URL: Git url to your repo. Take this URL from Github. It should be format of git@github.com:{username}/{repo}.git
- Credentials: Select the one you created before.
- Branches to build:
$branch
-
Build -> Execute shell:
chmod +x gradlew ./gradlew clean ./gradlew assembleDebug -
Post-build Actions -> Archive artifacts:
**/*.apk
Press Save.
You can always configure this job later.
Run the job
-
Go to job and press Build with Parameters
-
Enter
masterbranch.
Press Start.
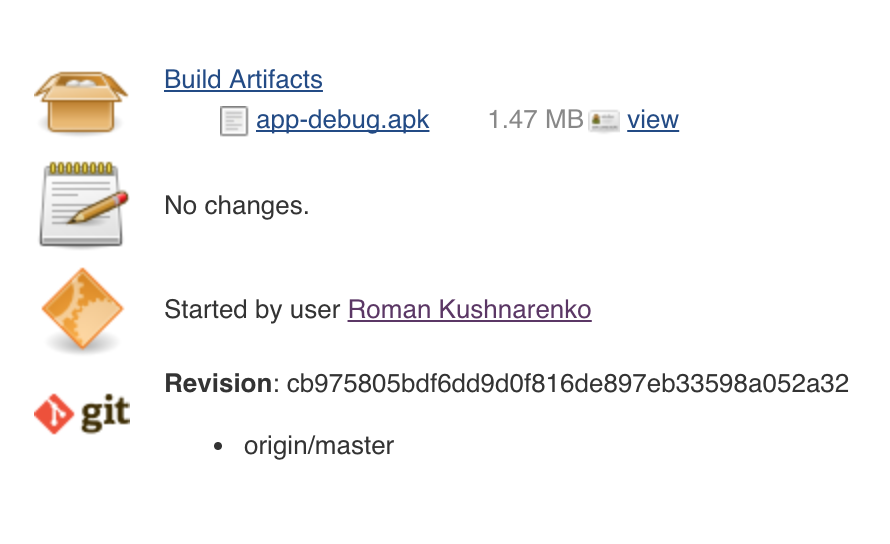
Now, you can watch the progress in Console Output. Once the job is finished successfully, you will see the APK 🎉.
Errors you might get
-
Cannot run program “git”:java.io.IOException.
You are missing git, just install it and run the job again.
sudo apt-get install git -
Lint failing. Add to gradle file:
lintOptions { checkReleaseBuilds false abortOnError false } -
Missing some SDK components. Make sure to install them via
sdkmanageras we did before.
Helpful stuff
-
Start / restart jenkins
sudo service jenkins start sudo systemctl restart jenkins -
Update Jenkins
Once in a while it’s good to update to latest version.
sudo apt-get update sudo apt-get install jenkins -
Jenkins log tail
tail -f /var/log/jenkins/jenkins.log
Next blog post

In this part I will explain how to update Gradle file, setup signing options and build by types from Jenkins. Keeping sensitive keystore credential hidden.
Questions
If you have any comments, please open an issue at https://github.com/sromku/build-android-jenkins